How To: DIY Pantry Recycling Center Makeover
I know it’s not cool to say so, but I hate recyling. Or maybe it’s more accurate to say I’m incompetent at it. I forget to take it out on time, I get plastics and papers mixed up, and trash things when I should recycle them and vice versa. So it’s no surprise that our kitchen recycling area has long been an embarrassment:

That’s how our ‘recycling center’ used to look. Note the problems:
- General disaster
- Sorting?
- Shallow pantry means the doors won’t close when it’s in this state
- How many brown paper bags does a guy need?
Well, after an inspiring trip to my local True Value store, I decided this was a solvable situation. I searched the internet far and wide for some recyling bins I could just buy, but our 10-inch-deep pantry made that very difficult.
When I spotted some sheets of white corrugated plastic at True Value (we’re in their 2011 Blog Squad), a lightbulb went off: I could make my own recycling bins!
Corrugated plastic is usually used for lawn signs and such, but it’s actually pretty sturdy, and quite easy to work with (fold, cut, etc.). So I picked up two 30×36-inch sheets, and a few other supplies too:
- Corner brackets to reinforce the corners
- Silicone caulk to seal up the inside
- Duct tape to attach the pieces together
- Friction lid supports to build some kind of tilt-out mechanism
All this stuff cost me under $25. Next, I went to work building a simple box. I wanted to minimize seams (to make the boxes sturdier), so I just folded a sheet into four sides along the 36-inch length, making a box with 9-inch sides. Then I folded in each of the sides at the bottom to make a base for the box:
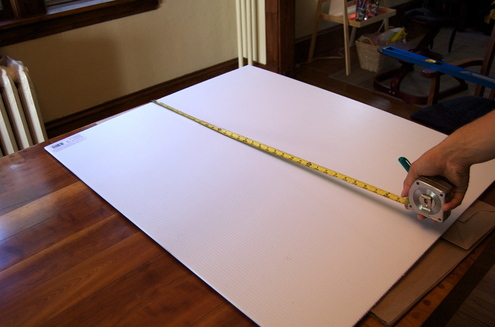
You can make a box of almost any size to fit your space! Just make sure to measure. It’s usually good for boxes to have four equal sides. Just sayin’.

Score the plastic on the opposite side of the direction of the fold. Careful not to cut through! Don’t cut your awesome solid-cherry dining room table that your father-in-law made by hand thirty years ago!

Sharp knife = straight cuts. Learned that in kindergarden.

I just made cuts to create four flaps, which I then folded down to make a bottom for the box. Then I just closed everything up with duct tape:

(Note the baby in the corner. That’s on purpose)

I added some corner brackets to the, uh, corners, for some extra stiffness.

Finally, some silicone to seal things up on the inside.
At this point, my boxes were done, but somewhat boring-looking. Also, after a quick dry-run in the pantry, I realized my fancy ’tilt-out’ solution using the friction lid supports was overkill, so I scrapped that part. The bins work just fine without it.
Alicia, my wife, suggested I add some nice recycling icons to the bins, and I had some scraps of contact paper lying around, so I went to it.
First, I designed my logos in Illustrator (you can download my AI and PDF files if you want to use them):

I printed these guys out and traced them onto my contact paper:

Then I placed the contact paper on the bins (again, measuring to get them centered and square), and cut out the design with a craft knife:

Then it was time to paint! We had some black spray paint left over from a previous project, so I went with that. Find a well-ventilated, but not windy area (otherwise you’ll get dust and junk sticking to your surface):

(You know the drill with spray paint, right? Several light coats, avoid drips, start and finish your strokes off the surface).
After a couple hours to dry, it was time to peel back the stencil:

(Note the smears: I cleaned those up easily with a Q-tip and some mineral spirits).
Here’s what they look like, all finished up:

And another “beauty” shot:

Now our recycling monster is nicely hidden from view, and I know exactly which bin paper goes in. What do you think? What’s your favorite recycling center solution?


