Recipe: How to Make Homemade Pancetta from Scratch

All this week, ManMade is excited to be teaming up with America’s Test Kitchen to share lots of cool, DIY food crafts and ideas, any which would make an excellent weekend project or a great handmade holiday gift for your family and friends.

Homemade charcuterie – the craft of curing, aging, and preserving meat – is a centuries old tradition experiencing a renaissance by the “hands on” artisan set, who are eager to move beyond canning and infusing and get down to some hardcore butchery. Homemade pancetta – cured pork belly from Italy – is a great place to start. The ingredients are easy to get your hands on, and all the work happens in the fridge, without depending on hang drying with natural molds and bacteria, like aged sausages and other hard meats. Plus, this stuff goes for $12.99 a pound at my local market, so there’s every reason to dress up and age some $3.99 pork belly and do the curing yourself. Chances are, it’ll taste better too.
Recipe: Makes about 3 lbs – Start today, enjoy in about 3 weeks
- 1⁄4 cup Diamond Crystal
- kosher salt
- 3 tablespoons coarsely ground pepper
- 2 tablespoons packed dark brown sugar
- 2 tablespoons minced fresh rosemary
- 2 tablespoons juniper berries, cracked
- 4 garlic cloves, minced
- 4 bay leaves, crumbled
- 1 tablespoon red pepper flakes
- 1 tablespoon minced fresh thyme
- 1 teaspoon pink salt
- 1 teaspoon ground nutmeg
PORK BELLY
- 1 (5-pound) pork belly, skin removed, belly trimmed to uniform thickness and shape
- 1⁄4 cup dry red wine
- 2 tablespoons coarsely ground pepper
Step One: FOR THE DRY CURE: Combine all ingredients in small bowl.
Step Two: FOR THE PORK BELLY: Place pork belly in 13 by 9-inch glass bak- ing dish. Rub all sides and edges of pork belly with dry-cure mixture. Sprinkle with wine, being careful to not wash away any cure. Cover dish tightly with plastic wrap and refrigerate until belly feels firm yet pliable, 7 to 10 days, flipping every other day.
Step Three: Thoroughly rinse pancetta with cold water and pat dry with paper towels. Transfer to cutting board meaty side up, with long side facing you. Sprinkle meaty side with pepper, then roll into tight cylinder and tie very tightly at 1⁄2-inch intervals with kitchen twine.
Step Four: Place pancetta on wire rack set in rimmed baking sheet and refriger- ate, uncovered, until very firm but not hard, 2 to 3 weeks. (Alternatively, use additional kitchen twine to form loop at one end of pancetta and hang pancetta in cool, humid place, around 60 degrees with 60 percent humidity, away from sunlight.) Dried pancetta can be wrapped tightly in plastic and refrigerated for up to 2 weeks or frozen for up to 2 months.
Dan Zuccarello from America’s Test Kitchen says,
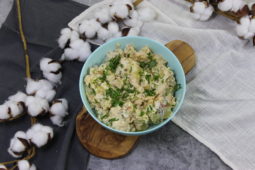
After two or three weeks, the pancetta should be very firm but not hard. Since it’s not meant to be eaten raw, I usually slice it thin and crisp it in a skillet or cube it for soups and stews. If you eventually decide to try the hang-drying method, just remember even if you do everything right, things can still go wrong because of the environmental factors. If you see a white mold, just wipe it off with a little vinegar. And if the exterior of the pancetta seems hard or conditions become less ideal, at any time you can move it to the refrigerator, where you’re guaranteed success.

Grab your own copy of America’s Test Kitchen’s D.i.Y. Cookbook, featuring 100+ foolproof kitchen projects for the adventurous home cook https://amzn.to/S7jlIL and follow them on Twitter @TestKitchen
Recipe by Dan Zuccarello. Photos by Anthony Tieuli.