DIY Mouse Trap: Homemade Solutions for Catching Mice
Dealing with mice in the home can be a frustrating and challenging problem. While store-bought traps are readily available, they often come with limitations. In this article, we will explore the world of DIY mouse traps, offering creative and effective homemade solutions to help you address your rodent issues. From traditional methods to innovative designs, we will guide you through the process of creating your own DIY mouse traps, providing step-by-step instructions, safety tips, and troubleshooting advice.
Understanding the Problem
Having mice in the home can pose various risks, from property damage to health concerns. Addressing the issue promptly is crucial to prevent further infestations and potential harm. While store-bought traps can be effective, they may not always suit your specific needs or budget.

Essential Components for a DIY Mouse Trap
When it comes to creating your own DIY mouse trap, you’ll be surprised at the range of common household items that can be repurposed for this purpose. From cardboard tubes to plastic bottles, there are numerous cost-effective materials that can be used to construct effective traps. However, it’s crucial to prioritize safety when working on DIY projects and to ensure that the materials used are pet and child-friendly.
Traditional and Innovative DIY Mouse Traps
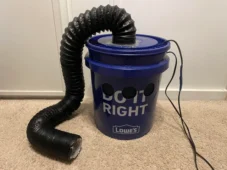
Time-tested methods like bucket traps and rolling log traps have been employed for generations to successfully catch mice. Despite their seemingly old-fashioned nature, these techniques boast high effectiveness, and their simplicity facilitates straightforward construction and setup. Bucket traps typically involve a baited container and a ramp, enticing mice to fall in, while rolling log traps use a cylindrical mechanism to swiftly capture rodents.
As for the innovative yet creative approach, you can use the cardboard tube roll-and-catch trap. Simply flatten one end of a cardboard tube to create a platform, then balance it on the edge of a countertop or table. Place bait at the far end of the tube, and as the mouse ventures onto it, the tube will roll, causing the mouse to slide into a strategically placed container or bin. This showcases the power of repurposing everyday items for effective and imaginative rodent control, making these DIY traps both practical and inventive.

Step-by-Step Guide to Building a DIY Mouse Trap
In this section, we’ll provide detailed instructions for constructing a simple yet effective trap. Precision and attention to detail are key when building traps, and we’ll offer tips for ensuring that the trap is both humane and safe for both mice and humans. With our step-by-step guide, you’ll be able to create a reliable DIY mouse trap in no time.
Materials Needed:
- Small wooden board or sturdy cardboard
- A plastic container with a lid (like a small bucket or yogurt container)
- Wire or string
- Pencil or dowel
- Bait (peanut butter, chocolate, or cheese)
- Saw
- Drill with a small bit
- Sandpaper
Instructions:
1. Prepare the Container:
A. Cut a small entrance hole near the top of the container. This should be large enough for a mouse to enter but not too big.
B. Smooth any rough edges around the hole using sandpaper to prevent injury to the mice.
2. Create the Trap Mechanism:
A. Cut the wooden board or sturdy cardboard into a ramp. This will act as the mouse’s pathway into the container.
B. Attach the ramp to the container, ensuring it leads up to the entrance hole.
C. Drill a hole near the top of the container on the opposite side of the entrance hole.
D. Thread a piece of wire or string through the hole, creating a loop inside the container.
3. Set up the Bait:
A. Place a small amount of bait inside the container near the entrance hole. Peanut butter, chocolate, or cheese works well.
B. Smear a bit of bait on the ramp to attract the mouse.
4. Set the Trap:
A. Balance the container on the edge of a countertop or table with the entrance hole hanging slightly over the edge.
B. Hang the looped wire or string over the pencil or dowel, creating a precarious balance.
5. Placement and Monitoring:
A. Put the trap in areas with high mouse activity, such as along walls or near food sources.
B. Regularly check the trap and relocate it if there’s no success after a few days.
C. Ensure the trap is placed out of reach of pets and children.
Baiting and Placing Your DIY Mouse Trap
Choosing the right bait is fundamental in ensuring the success of your DIY mouse trap. Mice are attracted to specific scents and tastes, and understanding their preferences is key to crafting an effective trap. Scientific insights into rodent behavior reveal that peanut butter, chocolate, and seeds are among the most enticing bait options.
Additionally, consider the location of your traps strategically. Mice tend to follow established pathways, so placing traps in areas with high mouse activity, such as near food sources or along walls, significantly increases the chances of success. By mastering the art of baiting and placing traps, you can outsmart mice and create a more efficient mouse control strategy.
Safety Precautions and Considerations
Ensuring the safety of pets and children is paramount when dealing with DIY mouse traps. Choosing materials wisely is the first step. Opt for safe and non-toxic materials that effectively trap mice without posing risks to curious pets or children.
Trap designs that enclose the bait and prevent accidental contact are ideal for a household with animals or young family members. Also, understanding proper handling and disposal techniques is essential. Utilize humane methods to dispose of captured mice, emphasizing safety throughout your DIY mouse control journey.
Troubleshooting and Improving DIY Mouse Traps
Bait theft is a common challenge in DIY mouse trapping. Preventing this issue involves securing the bait more effectively, such as using bait stations or enclosed compartments. Experiment with innovative trap designs, such as those incorporating multiple entry points or adjustable sensitivity settings.
By understanding common issues and implementing creative solutions, you enhance the overall efficiency of your traps, ensuring consistent success in your mouse control efforts. You should continue learning from each attempt, adjusting your mouse traps to produce better results as you continue setting them up.
Related Articles:
Creating your own DIY mouse traps can be a rewarding and effective way to address rodent issues in the home. By exploring traditional and innovative methods, understanding the essential components, and prioritizing safety, DIY enthusiasts can tackle their mouse problems with confidence. We encourage our readers to take action, share their experiences, and embrace the satisfaction of DIY projects and problem-solving.


