From Drip to Dry: How to Quickly Fix a Leaky Shower Faucet
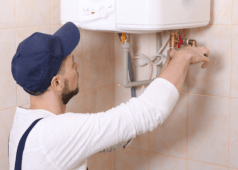
So, you’ve noticed that incessant drip-drip-drip coming from your shower faucet, and it’s driving you nuts. Fear not, because fixing a leaky shower faucet isn’t just a job for the pros. Imagine yourself as the handyman hero in your own DIY adventure. Armed with a wrench, some plumber’s tape, and a bit of determination, you’re about to embark on a mission to conquer that leak and reclaim your bathroom’s tranquility.
Dive into our step-by-step guide that will transform you from a leaky faucet rookie into a plumbing maestro, all while keeping your cool and maybe even scoring some extra brownie points at home. Ready to roll up those sleeves and get to work? Let’s do this!

Identify the Type of Faucet
Before you start, you need to identify the type of shower faucet you have. There are three main types: compression, ball, and cartridge faucets. Each type requires a slightly different approach for repairing leaks.
Compression Faucets
Compression faucets have separate hot and cold handles. They work by compressing a rubber washer to stop water flow. These are more common in older homes.

Ball Faucets
Ball faucets have a single handle that controls both the temperature and flow of water. They use a ball bearing to regulate the water.

Cartridge Faucets
Cartridge faucets can have either one or two handles and use a cartridge to control the flow of water. These are commonly found in modern homes.

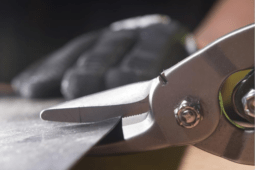
Gather Your Tools and Materials
Having the right tools and materials on hand will make the repair process much smoother. Here’s what you’ll need:
- Screwdrivers (both flathead and Phillips)
- Adjustable wrench
- Pliers
- Plumber’s tape
- Replacement parts (washers, O-rings, cartridges)
- Towel or rag
- Vinegar (for cleaning)
Step-by-Step Guide to Fixing a Leaky Shower Faucet
Step 1: Turn Off the Water Supply
The first and most crucial step is to turn off the water supply to the shower. Locate the shut-off valve, which is usually found in the basement or utility room, and turn it off. Open the faucet to drain any remaining water.
Step 2: Remove the Faucet Handle
Use a screwdriver to remove the screw holding the handle in place. Once the screw is removed, gently pull off the handle. If it’s stuck, use a rag to protect the finish and gently wiggle it loose with pliers.

Step 3: Inspect the Faucet Parts
With the handle removed, you can now see the inner components of the faucet. Inspect the parts for any visible signs of wear or damage. Look for worn-out washers, O-rings, or cartridges, depending on your faucet type.
Step 4: Replace the Damaged Parts
Remove the damaged parts using the appropriate tools. For compression faucets, replace the rubber washer. For ball faucets, replace the ball bearing and springs. For cartridge faucets, replace the cartridge. Make sure to use plumber’s tape on any threaded parts to ensure a tight seal.
Step 5: Reassemble the Faucet
Once the damaged parts are replaced, reassemble the faucet in the reverse order of disassembly. Make sure all screws and parts are securely in place.

Step 6: Turn On the Water Supply
Turn the water supply back on and test the faucet. Check for any leaks and ensure everything is working correctly. If the leak persists, you may need to recheck the assembly or consider replacing additional parts.
Tips and Tricks
- Use Vinegar for Cleaning: Soak parts in vinegar to remove mineral deposits and improve performance.
- Keep a Towel Handy: Always have a towel or rag nearby to catch any drips and keep your workspace dry.
- Take Pictures: Before disassembling the faucet, take pictures to help you remember how to reassemble it correctly.

Preventative Maintenance
Preventive maintenance can help you avoid this common household issue. Regular checks and minor repairs can extend the life of your faucet and maintain its efficiency. Below are some key preventive maintenance details and tips to help you keep your faucets in good working condition.
Regular Inspection
Visual Check
Conduct a visual inspection of your faucets at least once a month. Look for signs of corrosion, rust, or mineral buildup around the spout and handles. Early detection of these issues can prevent more significant damage in the future.

Listen for Drips
Pay attention to any dripping sounds, even if they are intermittent. A small drip can indicate a larger problem that needs addressing. If you hear a drip, try to locate its source and take appropriate action immediately.
Cleaning and Maintenance
Clean Aerators
Over time, aerators can become clogged with mineral deposits, affecting water flow and potentially causing leaks. Remove and clean the aerators every few months using a mixture of vinegar and water to dissolve any buildup.
Lubricate Moving Parts
Faucets have moving parts that can wear out or become stiff. During your regular maintenance routine, use plumber’s grease to lubricate O-rings, washers, and other moving components. This not only prevents leaks but also ensures smooth operation.
Tightening and Replacing Parts
Tighten Loose Components
Loose handles, nuts, and other components can lead to leaks. Check for any parts that might need tightening and use a wrench to secure them properly. Be careful not to overtighten, as this can cause damage.
Replace Worn-Out Parts
Washers and O-rings tend to wear out over time and are often the main culprits behind a leaky faucet. Replace these parts as needed—typically every one to two years. Keeping spare parts handy can help you make quick repairs and avoid prolonged leaks.

Related Articles
- How to Snake a Toilet – Step-by-Step Drain Clearing Guide
- Complete Guide: How to Remove a Bathtub Drain Easily
- How to Solder Copper Pipe Quick and Easy
By following this detailed guide and utilizing the tips and tricks provided, you can effectively fix a leaky shower faucet and save money on water bills. Happy repairing!
Frequently Asked Questions (FAQs)
How do I know which type of faucet I have?
Identify the type by examining the handle and internal components. Compression faucets have separate handles for hot and cold, ball faucets have a single handle with a ball bearing, and cartridge faucets can have one or two handles with a cartridge inside.
What if my faucet is still leaking after replacing the parts?
If the leak persists, double-check the assembly. Ensure all parts are installed correctly and securely. If the problem continues, you may need to replace additional components or consult a professional plumber.
How often should I replace faucet components?
It depends on the quality of the components and the hardness of your water. Generally, washers and O-rings should be replaced every 1-2 years, while cartridges and ball bearings can last longer.
Can I use any type of plumber’s tape?
To ensure a tight and secure seal, it’s best to use high-quality plumber’s tape designed for water fittings.