How to Get Your A/C Clean After a Long Summer
As the summer heat lingers, your trusty air conditioner has been working overtime to keep you cool and comfortable. But have you ever wondered what might be lurking inside that hardworking appliance? Dust, debris, and even mold can accumulate over time, reducing your A/C’s efficiency and potentially compromising your indoor air quality. Don’t sweat it, though! With our comprehensive guide, you’ll learn how to give your air conditioner the TLC it deserves before summer bids farewell.
1. Essential Equipment for Thorough A/C Cleaning
Before diving into the cleaning process, it’s crucial to assemble the right tools for the job. You’ll need a screwdriver, a soft brush or vacuum attachment, a spray bottle filled with equal parts water and white vinegar, a garden hose, and a fin comb. Don’t forget to grab some protective gear, too – safety glasses and gloves will keep you safe during the cleaning process.

Having the proper equipment on hand will make the cleaning process smoother and more efficient. It’s also a good idea to have some clean microfiber cloths and a bucket of warm, soapy water nearby. With these tools at your disposal, you’ll be well-prepared to tackle even the grimiest air conditioner units.
2. Preparing Your A/C Unit for Cleaning Safely
Before you start scrubbing away, it’s essential to prioritize safety. Begin by turning off your air conditioner at the thermostat and shutting off the power at the circuit breaker or fuse box. This step is crucial to prevent any electrical accidents while you’re working on the unit. Once the power is off, give the unit some time to cool down completely before you start cleaning.

While waiting for the unit to cool, take a moment to inspect the area around your A/C. Clear away any debris, leaves, or branches that may have accumulated near the outdoor unit. This will not only make your cleaning job easier but also improve airflow around the unit, enhancing its overall efficiency.
3. Tackling the Exterior: Cleaning the Outdoor Unit’s Condenser Coils
Now that you’re ready to start cleaning, focus on the outdoor unit first. Remove the protective grille or fan cage to access the condenser coils. Using your soft brush or vacuum attachment, gently remove any loose debris, leaves, or dirt from the coils. Be careful not to bend or damage the delicate fins during this process.

For stubborn dirt and grime, use your spray bottle filled with the water and vinegar solution. Spray the coils generously and let the solution sit for a few minutes to break down the buildup. Then, use your garden hose to rinse the coils thoroughly, working from top to bottom. Avoid using a pressure washer, as the high pressure can damage the fins.
4. Straightening the Fins: Improving Airflow for Better Efficiency
After cleaning the condenser coils, take a close look at the fins. Over time, these thin metal slats can become bent or misaligned, restricting airflow and reducing your A/C’s efficiency. This is where your fin comb comes in handy. Gently run the comb through the fins, straightening any bent areas. Work slowly and carefully to avoid causing further damage.

If you notice any severely damaged or crushed sections of fins, it may be best to call in a professional. They can assess the damage and determine whether repairs or replacements are necessary. Remember, properly aligned fins are crucial for optimal heat transfer and overall A/C performance.
5. Indoor Unit Care: Cleaning Filters and Evaporator Coils
With the outdoor unit sparkling clean, it’s time to move indoors. Start by locating your A/C’s air filter. Depending on your unit, you may need to clean or replace this filter. If it’s washable, give it a thorough rinse with warm, soapy water and allow it to dry completely before reinserting. For disposable filters, simply replace them with a new one.

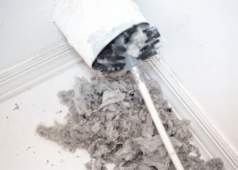
Next, access the evaporator coils inside your indoor unit. These coils can accumulate dust and debris over time, reducing your A/C’s cooling capacity. Using your soft brush or vacuum attachment, gently remove any visible dirt. For more thorough cleaning, you can use a foaming coil cleaner specifically designed for this purpose. Follow the product instructions carefully, and be sure to catch any drips or runoff with a towel or tray.
6. Final Checks: Ensuring Your A/C is Ready for the Last Summer Days
With all the cleaning and maintenance complete, it’s time for some final checks before firing up your newly cleaned A/C. Double-check that all components are securely in place, including the fan cage, access panels, and air filter. Ensure that the area around your outdoor unit is clear of any debris that may have been disturbed during cleaning.

Turn the power back on at the circuit breaker and set your thermostat to cool. Listen for any unusual noises as your A/C starts up, and monitor its performance over the next few hours. You should notice improved airflow and cooling efficiency. If you encounter any issues or if your A/C isn’t performing as expected after cleaning, don’t hesitate to contact a professional HVAC technician for a more thorough inspection.
Related Articles
- How to Clean Your AC Condenser Unit Effectively
- A Comprehensive Guide for Window Air Conditioner Installation
- 11 Surprising Home Maintenance Misconceptions You Should Know
Congratulations! You’ve successfully given your air conditioner a thorough cleaning, ensuring it’s ready to keep you cool and comfortable as summer draws to a close. Regular maintenance like this not only improves your A/C’s efficiency but can also extend its lifespan, saving you money in the long run. Plus, you’ll be breathing easier knowing that your indoor air is cleaner and fresher.
Ready to start your next project? Join our DIY community to receive tool tips, how-to guides, and exclusive creative insights. Subscribe to the ManMadeDIY newsletter now! Click here to unlock a world of hands-on inspiration.