Should You Paint Your Laminate Countertops?
This is the first question that comes to most homeowners’ minds when thinking about their outdated laminate counters, but let us tell you, laminate counters are definitely a candidate for a paint-based makeover.
On the contrary, there are homeowners who believe they have only two options — rip out their counters and start all over again or simply live with outdated, dreary countertops. But a third option is often more suited for most people: painting and working with what they already have.
Yes, it’s true. You can learn to paint your laminate countertops to execute an absolutely fresh and improved look. All it takes is a bit of research, some prep work, and the right tools and materials.
Let’s be real, laminate isn’t the most high-quality countertop material out there, and when it starts showing signs of wear, it can make your kitchen look dowdy. Showing your countertops some love with a painted makeover could buy you a few more years or more until you’re ready to take the plunge for new countertops.
There are tons of kits on the market—including those that replicate stone or granite. Or you can simply use acrylic interior paint in your color choice. The two keys to high-quality, lasting results are thorough preparation and proper sealing.
Choosing Paint
The possibilities are endless when selecting what paint to use for your laminate countertop project. Your local paint store can help you find the best type of paint to use for this project. Many suggest a water-based acrylic primer, paint, and top coat. Acrylic paint dries to provide the hard surface needed for heavy-use areas like countertops, while water-based acrylic paint cleans up with water and is low on odors.
Either way, you’ll want to ensure you have proper ventilation in your area while painting, so be sure to turn on a fan or open a window. If your final countertop color is dark, you may want to ask your paint supplier to add a tint to your primer. Paint store employees will know if this is required. Simply explain your project and final color and let them make the decision. Make sure your primer and paint are well mixed.
You can have the store do the mixing or use a paint stir stick at home. You should also decide the look that you are after. Do you want a solid color? Are you trying to replicate marble? Or do you want a granite-type look? All these styles can be replicated with paint, and if you are unsure of making these colors on your own, you can purchase a ready-to-makeover countertop painting kit.
How To Paint Laminate Countertops
Painting laminate kitchen countertops is well within the abilities of a DIY-savvy homeowner, so there’s no need to shy away from this project. Follow the steps below to transform your outdated laminate.
Supplies
For this project, the supply list is quite long but most items are affordable and you may even have some of these items kicking around in the garage.
- 1-gallon latex-based primer
- 1-gallon latex-based paint
- 1 gallon topcoat sealer
- Contact cement
- Medium-grit sandpaper
- Sanding block
- Palm sander
- Small paint roller and roller covers
- Paint tray
- Paint tray liners
- Painter’s tape
- Paintbrush
- Clean rags
- Mineral spirits
Step 1 – Preparation
To get you off on the right foot, proper preparation is key. Laminate countertops are smooth and sometimes shiny, so they aren’t a great surface for priming or painting—at least originally.
- First, examine your countertops thoroughly. If you see any laminate separating from the particle board underneath, repair it with some contact cement.
- Begin by scratching the countertop surface with medium grit sandpaper (220 grit is best). This will give the primer and paint something to grab onto.
- A palm sander is optional and can be used to speed up this step, but the goal is not to sand through the laminate but just to scratch it up, so proceed with caution.
- Use a rag and some mineral spirits to clean the dust from the surface once adequately scratched. Be sure to check for any areas you might’ve missed and give them quick scuffing as well.
Step 2 – Painter’s Tape
- After allowing the mineral spirits to dry thoroughly, apply painter’s tape to the countertop’s edges.
- Be sure to tape anything directly adjacent to the counter, such as the sink, cabinets, refrigerator, stove, and wall.
Step 3 – Priming
Once you have everything taped, you will want to move on to priming your countertop. Sufficient and properly done priming is key to success.
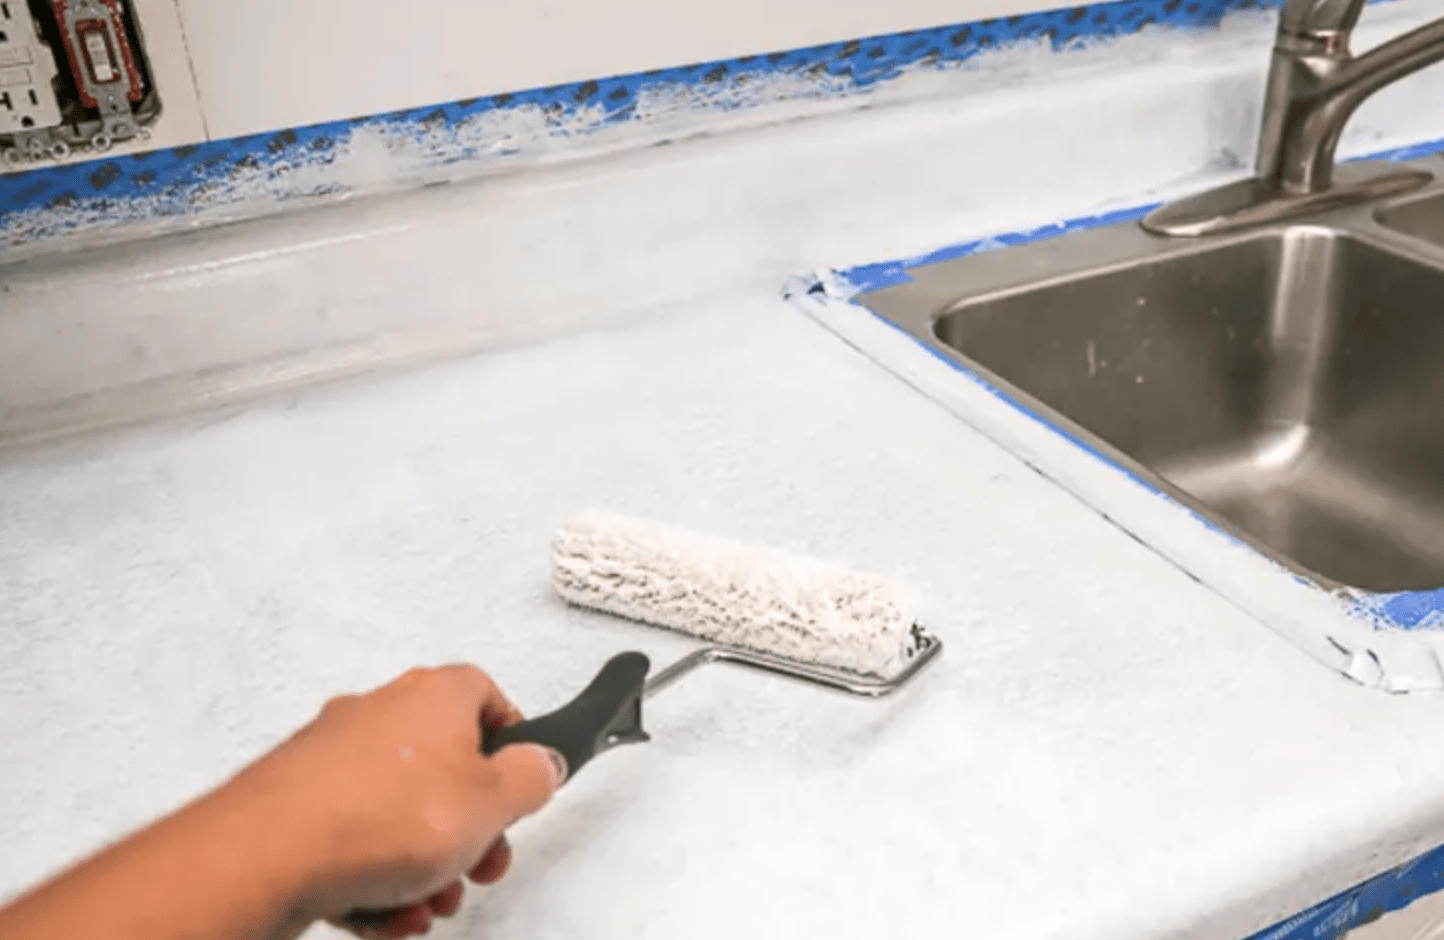
- Pour some primer into a paint tray, then, with a back-and-forth motion, use the roller to apply it to the laminate countertop.
- Ensure that you overlap each previous pass by a few inches to make sure you’re maintaining a wet edge.
- When you get to the inside corners and the edges, be sure to switch to the paintbrush.
- It’s best to brush the primer onto the counter while the rolled primer is still wet, as it will dry with a more uniform, flat texture.
- Always allow the primer to dry according to the manufacturer’s instructions. While the primer is drying, you can start prepping for paint.
- Pour any remaining primer back into the can, discard the tray liner, and place a new liner in the tray. Throw out the roller cover and clean the paintbrush with soap and water (mineral spirits also work well).
Step 4: Painting
Once the primer is sufficiently dry, you can begin painting.
- Thoroughly mix your paint and pour it into the paint tray. Use a fresh paint roller to apply it to the laminate countertop.
- Be sure to overlap each stroke to ensure you’re keeping a wet edge. Again, switch to the brush when you reach inside corners, the sink, the backsplash, or other hard-to-reach areas.
- Once the first coat dries, repeat this process for your second coat, but make sure that your first coat is completely dry.
- After the second coat, clean the paintbrush and replace the tray liner and roller cover.
Step 5 – Topcoat
The last step in painting laminate kitchen countertops is to cover the painted surface with a water-based topcoat, also known as a clear coat. This layer will protect the paint from water and other sources of deterioration.
- Applying the topcoat is very comparable to the priming and painting process. The only difference is that the clear coat can be difficult to see, so take your time.
- Be sure to overlap each roller stroke to ensure a wet edge, and use the brush to cover the corners, edges, and other areas. A second coat is highly suggested, but latex-based topcoats dry quickly, so it shouldn’t take too long.
And, with that final layer of topcoat dry, you’ve given a fresh new look to an old laminate countertop. The painted surface is durable but not quite as resistant to water and scratches as the laminate, so be sure to wipe up spills quickly and avoid scratching the paint as much as possible.
Common Mistakes and What Not to Do
Repainting your kitchen countertops is very doable and something DIY homeowners are doing every day. Painting countertops create a whole new look and increase your home value. However, to get a professional look at the end of the day, you need to make sure that you are doing the job thoroughly and without making these common mistakes.
Painted countertops are being completed all over and becoming a large trend, but this project is NOT for the faint of heart. This project requires prep, patience, and planning. Oh, and one more time — patience.
So before you tackle this project, be sure you avoid these common countertop painting mistakes.
Inadequate Preparation
This is a common problem with any painting project, but it is only heightened with countertops. Refinishing your countertops is not something you want to do fast and easy; take your time and prep correctly. Be sure to cover everything you don’t want to be painted and tape off everything carefully.
When it comes to sanding, an electric sander may seem like a faster choice, but beware, as it creates so much dust that it’s almost impossible to clear all the dust out of the air to create that smooth finish you want. The hand sander takes longer and it is harder, but it will help you create the smooth finish that you want.
Skip the sanding, and your paint may likely peel right off after all your hard work.
Choosing the Wrong Tools
Countertops will show brush strokes, no matter how good you think you are. The most suitable way to apply countertop paint is with a foam roller. Make sure you use a smooth foam roller to avoid a bumpy counter. Use a small brush for details and edges . Apply each coat with the same tools to ensure your brush strokes on the base coat don’t show through to the top.
If you are repainting a large counter space, you may want to consider buying a paint sprayer. Paint sprayers are able to give you a seamless finish and get in corners and edges better than a brush. There are many paint sprayers, but sadly, they aren’t equivalent. Choose a paint sprayer that is reasonably priced, strong enough to do large projects, and durable enough to last years, allowing you to paint even more projects in your home.
Photo Credit: Envato Elements
Rushing
Painting countertops takes time and effort. This is a project that should take at least one week, possibly two, and it’s a great time to plan a vacation after you’re done so you can let it dry thoroughly for 4-7 days before you even use it.
Each coat must have a chance to dry thoroughly before you continue, usually 24-48 hours. Most experts recommend 3 coats of paint and 4 coats of sealer, which means you have at least 7 days of painting. Then you need at least one week to two to allow the countertop sealant to cure. Summer is a great time to do this project. Eat outside on a picnic table; the heat will quicken the curing period.
Sealing
Seal your paint. Seal it often and seal it well. This is one area where you don’t want to skimp and save. Instead, splurge on the best sealer you can find. If you do not want clear-coat polyurethane, get an acrylic sealer that is designed for countertops.
Get sealers that are semi-gloss or gloss, which are made for durability. If you use a cheap sealer, it can ruin the whole project. The paint will not hold up on its own, it needs the protection of a sealant. You also want to be sure your sealant is food-safe since your countertop will be in close contact with food.
Recaulking
After you are done, go around the edges of your countertop and recaulk all of them. This prevents any water from getting caught in between your countertop and the wall and helps to create a nice yet elegant look.
A clear caulk won’t leave any white lines and looks seamless and professional.
Maintenance
The key to the long-lasting success of anything is proper maintenance. Without properly maintaining your painted laminate countertops, they will deteriorate faster.
To maintain your “new” countertops, do not use abrasive cleaners and scrubber sponges. You will want to instead clean them daily with a rag or soft sponge and mild dish detergent. Once a week (or at least monthly), wipe down with a slight amount of mineral oil and a clean, soft cloth. Your countertops will look super for several years to come!
Quick Tips
- Clean the surface thoroughly: Before painting, make sure the countertop is free of any dirt, grime, or grease. Use a gentle cleanser and water, and let it dry completely before painting.
- Sand the surface: Laminate is a slick surface, so it’s important to scuff it up with sandpaper before painting. This helps the paint adhere better.
- Use a primer: A good primer will help the paint stick to the laminate even more effectively. Make sure to choose a primer that’s specifically designed for laminate surfaces.
- Choose the right paint: Laminate countertops require a specific type of paint. Look for a high-quality, 100% acrylic paint that’s designed for use on laminate surfaces.
- Use a paintbrush: While some people prefer to use a roller for painting countertops, a paintbrush is typically better for getting into tight corners and edges.
- Apply multiple coats: To get a smooth, even finish, plan on applying at least two coats of paint, letting each coat dry completely before applying the next.
- Allow the paint to cure: After painting, let the countertop cure for at least 48 hours before using it. This will ensure that the paint has fully bonded to the surface.
- Seal the surface: For added durability and protection, consider applying a clear coat of sealer over the paint.
- Be careful with heat: Avoid placing hot items directly on the countertop, as this can damage the paint.
- Clean carefully: To keep your newly painted countertop looking great, use a gentle cleanser and avoid abrasive scrubbing pads.
Pros and Cons
Pros of Painting a Laminate Countertop:
- Cost-effective: Painting a laminate countertop is much cheaper than replacing it with a new granite one.
- Easy to do: With the right materials and a little bit of DIY know-how, painting a laminate countertop can be a relatively easy project.
- Instant gratification: You can see the results of your efforts almost immediately, as opposed to waiting for a new countertop installation.
- Customizable: With paint, you can choose any color or design you want, allowing you to personalize your kitchen.
- Less waste: By painting your existing countertop, you’re keeping it out of the landfill, which is better for the environment.
Cons of Painting a Laminate Countertop:
- Durability: Painted laminate countertops are not as durable as granite countertops and may need to be repainted every few years.
- Limited lifespan: Eventually, the laminate countertop will need to be replaced, and painting it will only prolong the inevitable.
- Not heat resistant: Painted laminate countertops are not heat resistant, so hot pots and pans should never be placed directly on the surface.
- May not look as good: While you can achieve a nice finish with paint, it may not look as good as a new granite countertop.
- Hard to fix mistakes: If you make a mistake while painting, it can be difficult to fix without starting over.
Frequently Asked Questions (FAQs)
What type of roller should I use?
For smooth surfaces like countertops, a foam roller cover is recommended for a smooth finish.
