The Secret to Perfectly Smooth Wood Every Time
Have you ever marveled at the silky-smooth finish of professionally crafted wooden furniture? The good news is that you can achieve the same results in your own workshop. With the right techniques, tools, and a bit of patience, you can transform rough lumber into a velvety-smooth masterpiece that will make your DIY projects shine. In this comprehensive guide, we’ll walk you through the steps to achieve perfectly smooth wood surfaces every time.
Start your next woodworking adventure with TedsWoodworking! Dive into 16,000+ projects and bring your ideas to life. Build unique furniture and master new skills with Ted’s detailed, step-by-step plans guiding you every step of the way.
Choosing the Right Wood

The journey to perfectly smooth wood begins with selecting the right materials. Different wood species have varying grain patterns and densities, which can affect the smoothing process. Hardwoods like oak, maple, and walnut are generally easier to smooth than softwoods like pine or cedar. Look for lumber with straight grain and minimal knots or defects. If possible, choose kiln-dried wood, as it’s less likely to warp or shrink after you’ve finished working on it.
When selecting your wood, pay attention to its moisture content. Wood with high moisture content can be more challenging to smooth and may lead to issues down the line. Use a moisture meter to ensure the wood is at an appropriate level for your project. Additionally, consider the intended use of your project when choosing wood. Some species are better suited for specific applications, such as outdoor furniture or cutting boards.
Using the Correct Tools

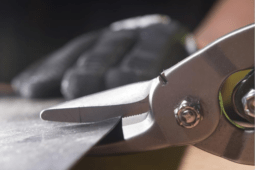
To achieve perfectly smooth wood surfaces, you’ll need the right tools in your arsenal. Start with a selection of sandpapers in various grits, ranging from coarse (60-80 grit) to extra-fine (220-320 grit). Invest in a quality random orbital sander for efficient large surface smoothing. Hand sanding blocks are essential for getting into corners and edges. Don’t forget a shop vacuum to keep your workspace clean and dust-free.
Other useful tools include a card scraper for removing small imperfections, a cabinet scraper for larger areas, and a burnishing tool to maintain your scrapers’ edges. Consider adding a hand plane to your toolkit for quickly removing material and achieving ultra-smooth surfaces. Finally, invest in good-quality dust masks, safety glasses, and hearing protection to keep yourself safe while working.
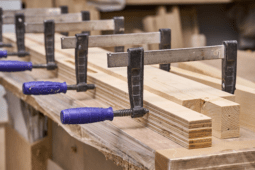
Preparing the Wood

Before you start smoothing, it’s crucial to prepare your wood properly. Begin by inspecting the surface for any visible defects, such as knots, cracks, or splinters. Use wood filler to address these issues, allowing it to dry completely before proceeding. If your wood has any rough spots or saw marks, use a hand plane or coarse-grit sandpaper to remove them. This step will save you time and effort in the long run.
Next, ensure your wood is clean and free from dust or debris. Use a tack cloth or compressed air to remove any particles that could interfere with the smoothing process. If you’re working with reclaimed or previously finished wood, you may need to strip off old paint or varnish before proceeding. Take the time to properly prepare your wood, as it will significantly impact the final result.
Sanding Techniques

The key to achieving a perfectly smooth wood surface lies in progressive grit sanding. Start with a coarse-grit sandpaper (60-80 grit) to remove any remaining roughness or imperfections. Work in the direction of the wood grain, applying even pressure across the surface. Once you’ve achieved a uniform surface, move on to medium-grit sandpaper (100-150 grit) to further refine the wood.
Continue progressing through finer grits, such as 180, 220, and even 320, depending on your desired level of smoothness. Between each grit change, thoroughly clean the surface to remove dust and debris. Pay special attention to edges, corners, and any intricate details in your project. Remember that patience is key – rushing through the sanding process can result in an uneven finish or visible scratches.
Advanced Smoothing Methods

While sanding is the most common method for smoothing wood, incorporating scrapers and hand planes can take your results to the next level. Card scrapers and cabinet scrapers are excellent tools for removing small imperfections and achieving a glass-like finish. To use a scraper effectively, hold it at a slight angle and apply firm, even pressure as you pull it across the wood surface.
Hand planes are another valuable tool for achieving ultra-smooth surfaces. They can quickly remove material and leave behind a remarkably flat and smooth finish. When using a hand plane, ensure the blade is sharp and properly adjusted. Take light passes, working with the grain of the wood. With practice, you’ll be able to achieve surfaces that are so smooth they almost feel polished to the touch.
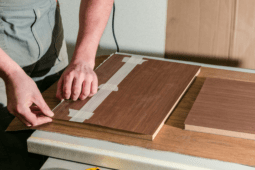
Sealing and Protecting Your Smooth Wood

Once you’ve achieved the desired level of smoothness, it’s time to protect your hard work. Apply a finish that complements your project and enhances the wood’s natural beauty. Options include oil-based finishes, water-based polyurethane, or traditional varnishes. Before applying the finish, ensure the wood surface is completely clean and dust-free. Use a tack cloth or vacuum to remove any particles.
Apply thin, even coats of your chosen finish, following the manufacturer’s instructions. Allow each coat to dry completely before lightly sanding with fine-grit sandpaper (320-400 grit) to remove any raised grain or imperfections. Repeat this process for multiple coats if desired. The final coat should be left unsanded for maximum protection and shine. Remember that different finishes may slightly alter the wood’s appearance, so test on a scrap piece first.
Related Articles
- Simple Methods for How to Tell if Wood is Pressure Treated
- A Comprehensive Guide to Properly Impregnating Wood to Preserve Wood
- 10 Essential Woodworking Techniques Every DIYer Should Master
Achieving perfectly smooth wood surfaces is a skill that improves with practice and patience. As you work on various projects, you’ll develop a feel for different wood types and refine your techniques. Don’t be discouraged if your first attempts aren’t perfect – even experienced woodworkers continually hone their skills. With persistence and attention to detail, you’ll soon be creating professional-quality smooth wood surfaces that will make your DIY projects stand out.
Ready to start your next project? Join our DIY community to receive tool tips, how-to guides, and exclusive creative insights. Subscribe to the ManMadeDIY newsletter now! Click here to unlock a world of hands-on inspiration.